倉庫貨物管理系統未來板參考程式
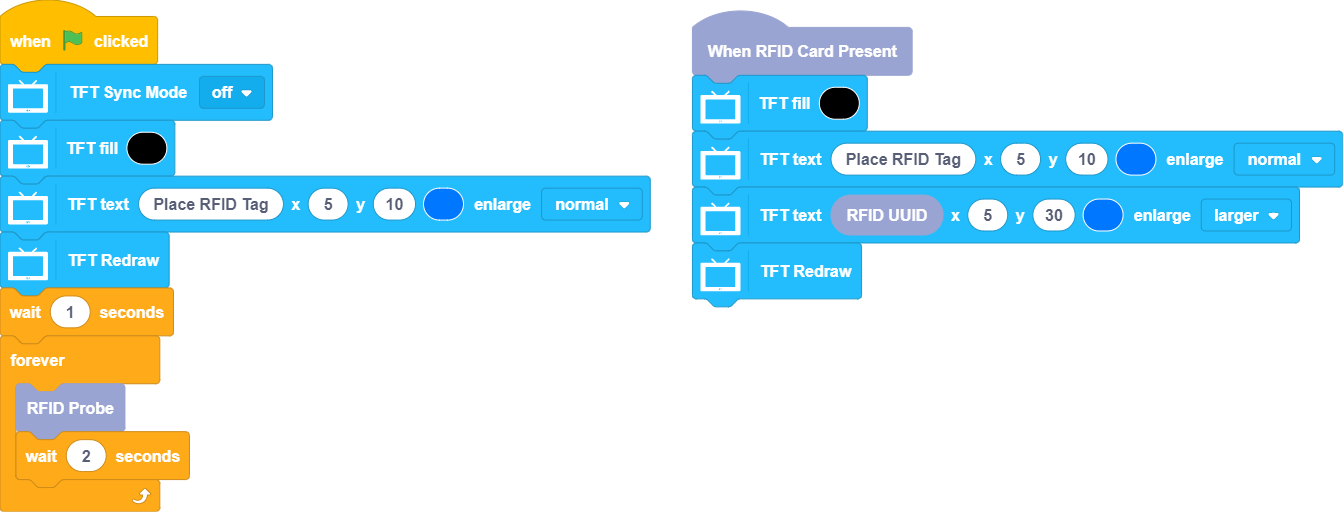
RFID參考程式
使用這程式查看RFID晶片ID。
KittenBlock
Python
#/bin/python

from time import sleep
from future import *
from sugar import *
def probeCallback():
  global x
  screen.fill((0, 0, 0))
  screen.text(str("Place RFID Tag"),5,10,1,(0, 119, 255))
  screen.text(str(RFID().uuid()),5,30,2,(0, 119, 255))
  screen.refresh()

x = 0
screen.sync = 0
screen.fill((0, 0, 0))
screen.text(str("Place RFID Tag"),5,10,1,(0, 119, 255))
screen.refresh()
sleep(1)
while True:
  RFID().probe(probeCallback if 'probeCallback' in dir() else None)
  sleep(2)
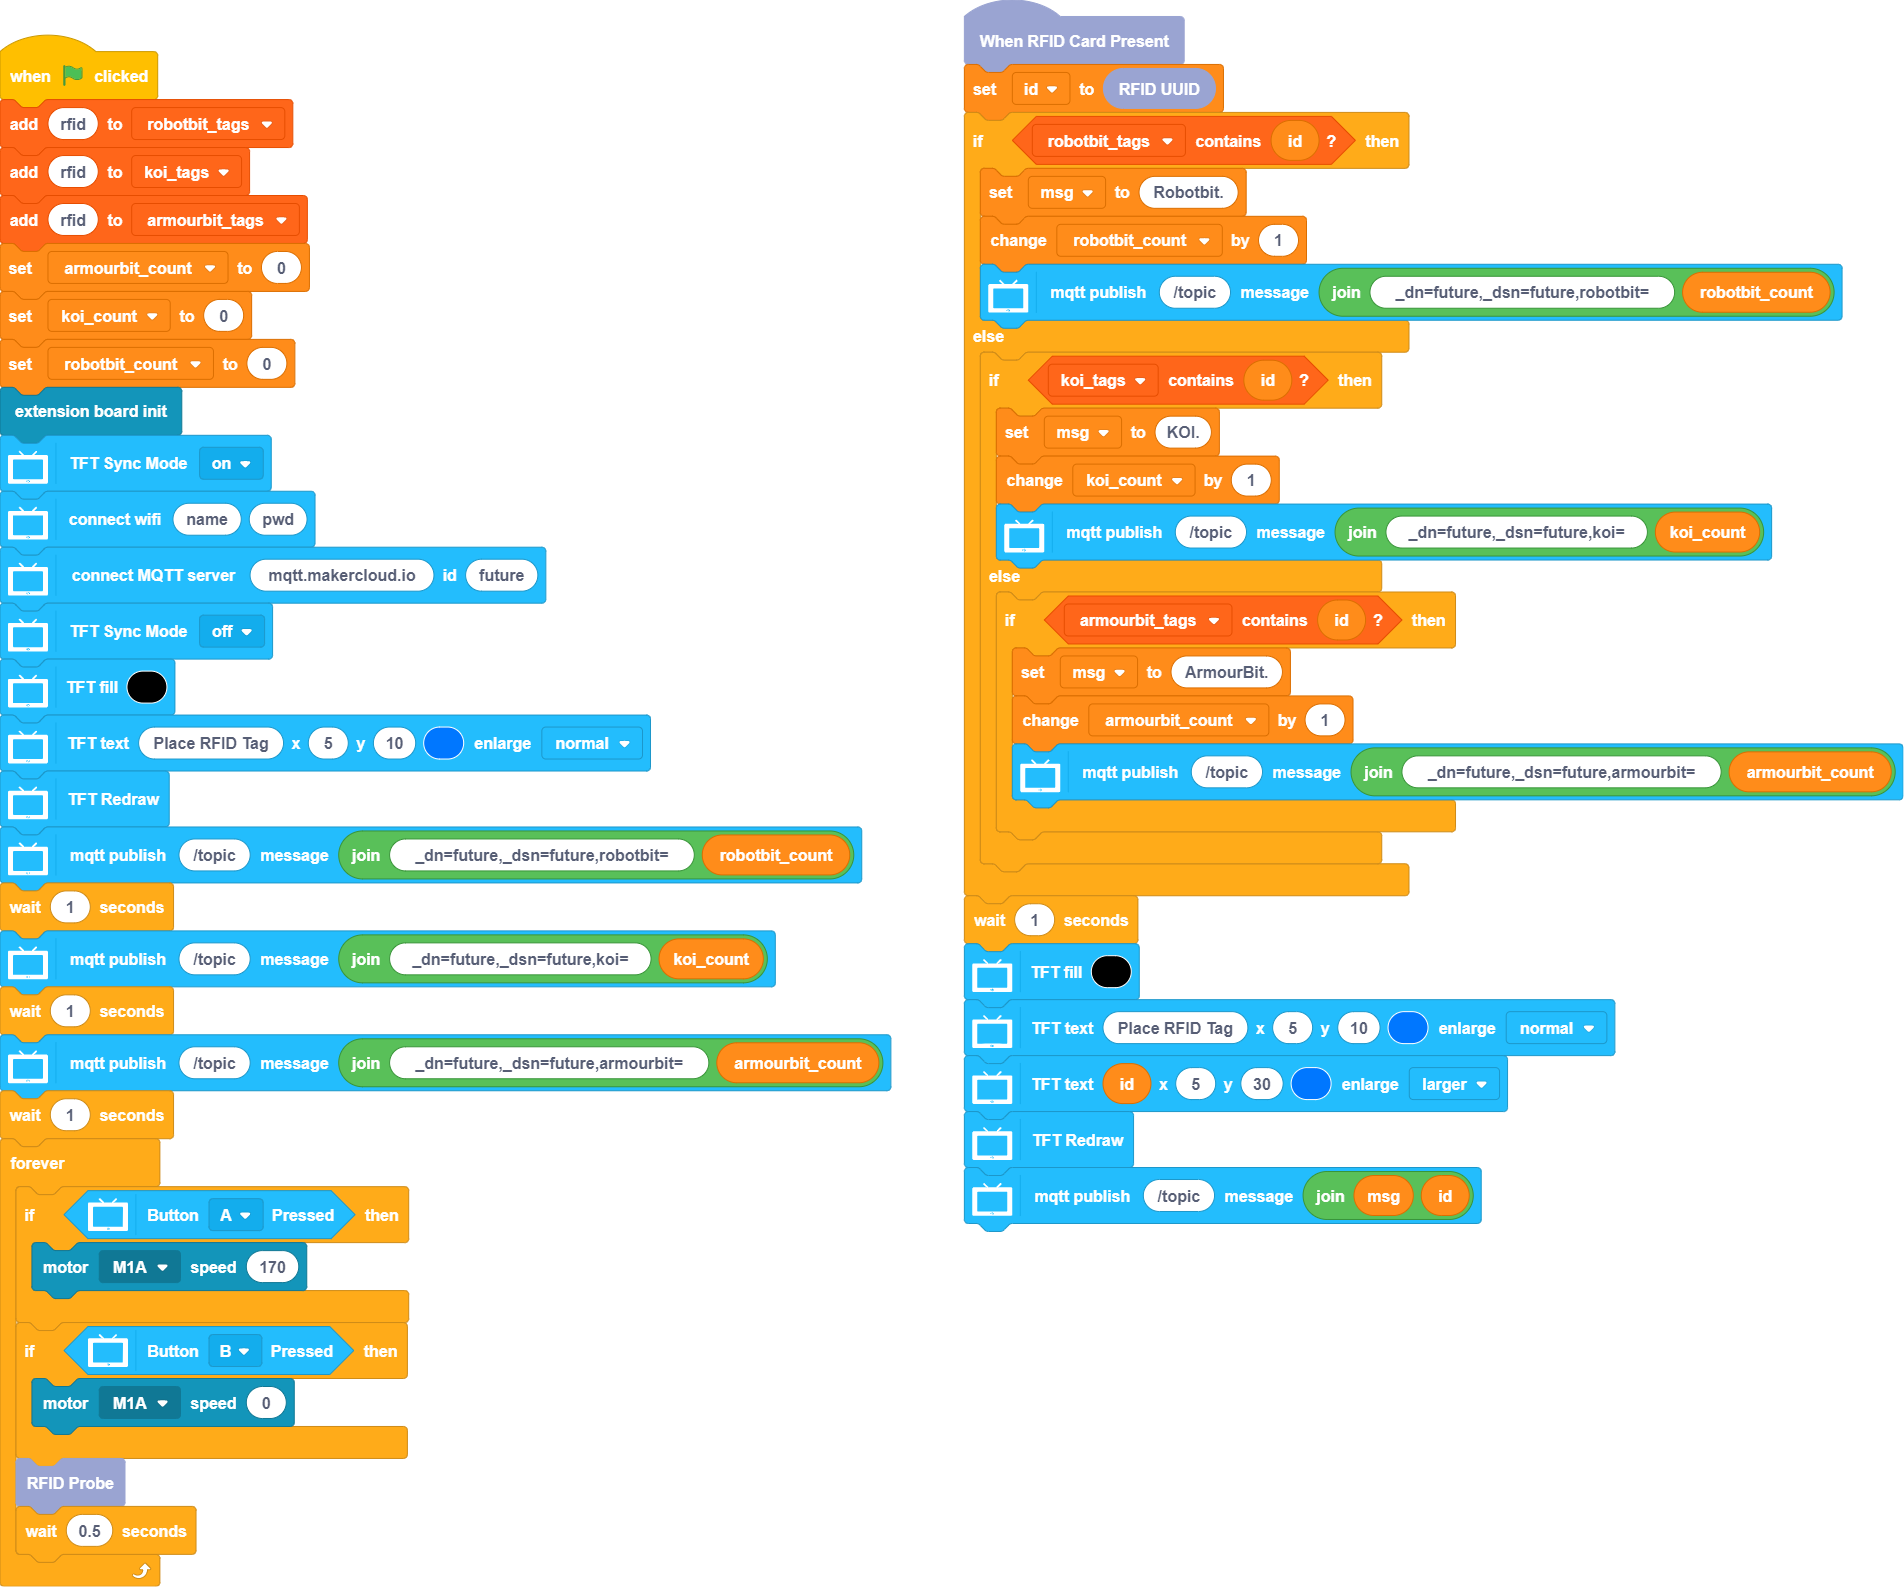
MakerCloud版參考程式
KittenBlock
Python
#/bin/python

from time import sleep
from future import *
from sugar import *
import mqttsimple
import robotbit
def probeCallback():
  global id,robotbit_count,koi_count,armourbit_count,msg
  id = RFID().uuid()
  if id in robotbit_tags:
    msg = "Robotbit."
    robotbit_count += 1
    mqtt.publish("/topic", str("_dn=future,_dsn=future,robotbit=")+str(robotbit_count))
  else:
    if id in koi_tags:
      msg = "KOI."
      koi_count += 1
      mqtt.publish("/topic", str("_dn=future,_dsn=future,koi=")+str(koi_count))
    else:
      if id in armourbit_tags:
        msg = "ArmourBit."
        armourbit_count += 1
        mqtt.publish("/topic", str("_dn=future,_dsn=future,armourbit=")+str(armourbit_count))
  sleep(1)
  screen.fill((0, 0, 0))
  screen.text(str("Place RFID Tag"),5,10,1,(0, 119, 255))
  screen.text(str(id),5,30,2,(0, 119, 255))
  screen.refresh()
  mqtt.publish("/topic", str(msg)+str(id))
id = 0
robotbit_count = 0
koi_count = 0
armourbit_count = 0
msg = 0
robotbit_tags = []
koi_tags = []
armourbit_tags = []
robotbit_tags.append("rfid")
koi_tags.append("rfid")
armourbit_tags.append("rfid")
armourbit_count = 0
koi_count = 0
robotbit_count = 0
robot = robotbit.RobotBit()
screen.sync = 1
wifi.connect(str("name"), "pwd")
mqtt = mqttsimple.MQTTClient("mqtt.makercloud.io", "future",port=1883)
mqtt.connect()
screen.sync = 0
screen.fill((0, 0, 0))
screen.text(str("Place RFID Tag"),5,10,1,(0, 119, 255))
screen.refresh()
mqtt.publish("/topic", str("_dn=future,_dsn=future,robotbit=")+str(robotbit_count))
sleep(1)
mqtt.publish("/topic", str("_dn=future,_dsn=future,koi=")+str(koi_count))
sleep(1)
mqtt.publish("/topic", str("_dn=future,_dsn=future,armourbit=")+str(armourbit_count))
sleep(1)

while True:
  if sensor.btnValue('a'):
    robot.motor(1,170)
  if sensor.btnValue('b'):
    robot.motor(1,0)
  RFID().probe(probeCallback if 'probeCallback' in dir() else None)
  sleep(0.5)
模型玩法
在程式填入Wifi的登入資料和MakerCloud的主題資料
在程式裡填入與貨品相應的RFID編號
開啟電源後等待未來板連接到MakerCloud
按A鍵啟動輸送帶,B鍵停止輸送帶
當RFID魔塊感應到貨物的RFID晶片後,未來板會顯示RFID資訊,並且會將貨物資料上傳到MakerCloud平台
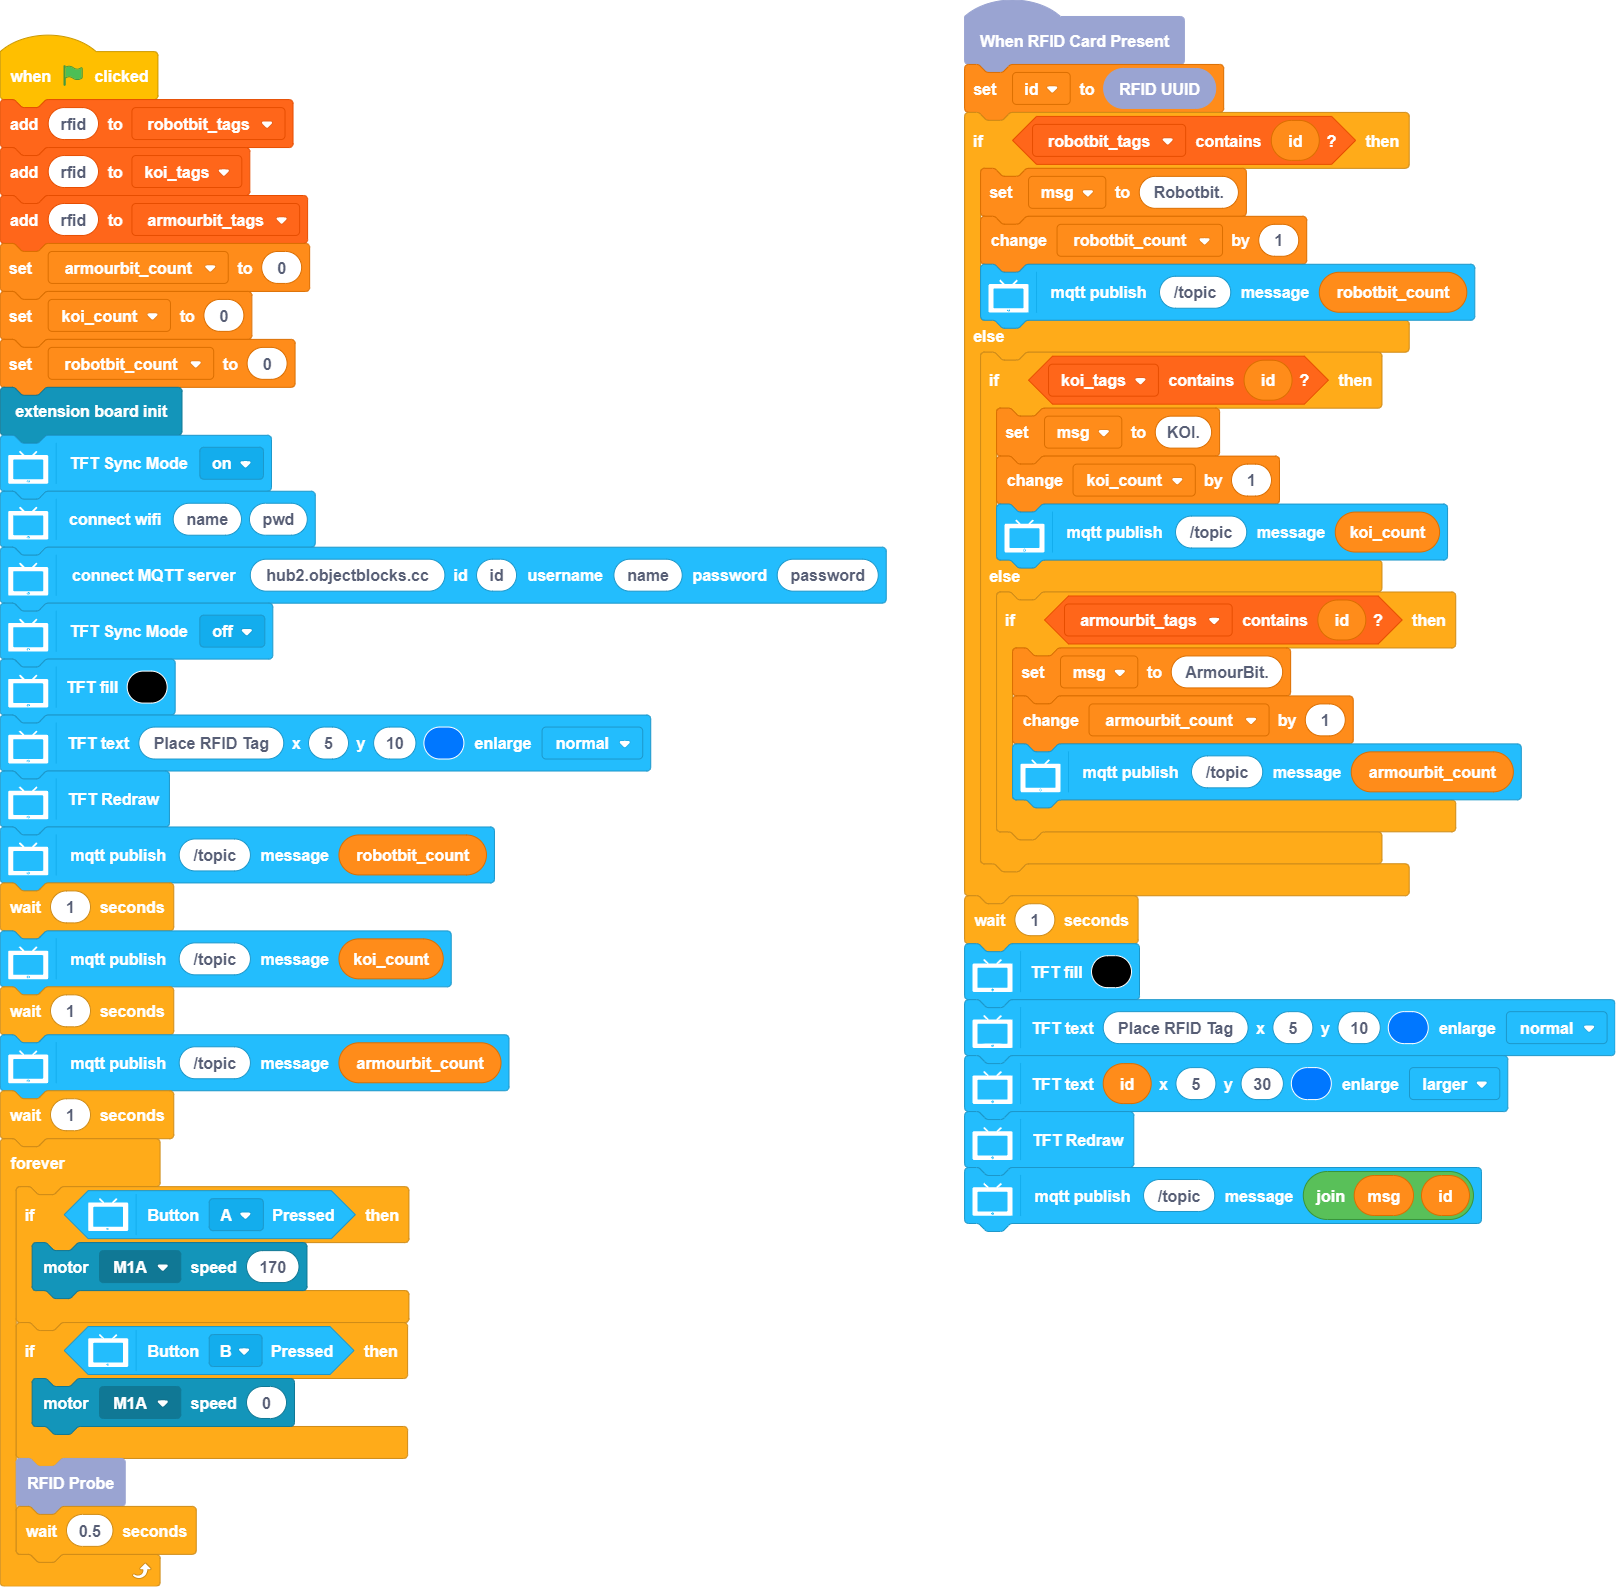
ObjectBlocks版參考程式
KittenBlock
Python
#/bin/python

from time import sleep
from future import *
from sugar import *
import mqttsimple
import robotbit
def probeCallback():
  global id,robotbit_count,koi_count,armourbit_count,msg
  id = RFID().uuid()
  if id in robotbit_tags:
    msg = "Robotbit."
    robotbit_count += 1
    mqtt.publish("/topic", robotbit_count)
  else:
    if id in koi_tags:
      msg = "KOI."
      koi_count += 1
      mqtt.publish("/topic", koi_count)
    else:
      if id in armourbit_tags:
        msg = "ArmourBit."
        armourbit_count += 1
        mqtt.publish("/topic", armourbit_count)
  sleep(1)
  screen.fill((0, 0, 0))
  screen.text(str("Place RFID Tag"),5,10,1,(0, 119, 255))
  screen.text(str(id),5,30,2,(0, 119, 255))
  screen.refresh()
  mqtt.publish("/topic", str(msg)+str(id))

id = 0
robotbit_count = 0
koi_count = 0
armourbit_count = 0
msg = 0
robotbit_tags = []
koi_tags = []
armourbit_tags = []
robotbit_tags.append("rfid")
koi_tags.append("rfid")
armourbit_tags.append("rfid")
armourbit_count = 0
koi_count = 0
robotbit_count = 0
robot = robotbit.RobotBit()
screen.sync = 1
wifi.connect(str("name"), "pwd")
mqtt = mqttsimple.MQTTClient("hub2.objectblocks.cc", "id",user=str("name"), password=str("password"),port=1883)
mqtt.connect()
screen.sync = 0
screen.fill((0, 0, 0))
screen.text(str("Place RFID Tag"),5,10,1,(0, 119, 255))
screen.refresh()
mqtt.publish("/topic", robotbit_count)
sleep(1)
mqtt.publish("/topic", koi_count)
sleep(1)
mqtt.publish("/topic", armourbit_count)
sleep(1)
while True:
  if sensor.btnValue('a'):
    robot.motor(1,170)
  if sensor.btnValue('b'):
    robot.motor(1,0)
  RFID().probe(probeCallback if 'probeCallback' in dir() else None)
  sleep(0.5)
模型玩法
在程式填入Wifi的登入資料和ObjectBlocks的主題資料
在程式裡填入與貨品相應的RFID編號
開啟電源後等待未來板連接到ObjectBlocks
按A鍵啟動輸送帶,B鍵停止輸送帶
當RFID魔塊感應到貨物的RFID晶片後,未來板會顯示RFID資訊,並且會將貨物資料上傳到ObjectBlocks平台
ThingSpeak版參考程式
KittenBlock
Python
#/bin/python

from time import sleep
from future import *
from sugar import *
import mqttsimple
import robotbit
def probeCallback():
  global id,robotbit_count,koi_count,armourbit_count,msg
  id = RFID().uuid()
  if id in robotbit_tags:
    robotbit_count += 1
    mqtt.publish("channels//publish", str("field1=")+str(robotbit_count))
  else:
    if id in koi_tags:
      koi_count += 1
      mqtt.publish("channels//publish", str("field2=")+str(koi_count))
    else:
      if id in armourbit_tags:
        armourbit_count += 1
        mqtt.publish("channels//publish", str("field3=")+str(armourbit_count))
  sleep(1)
  screen.fill((0, 0, 0))
  screen.text(str("Place RFID Tag"),5,10,1,(0, 119, 255))
  screen.text(str(id),5,30,2,(0, 119, 255))
  screen.refresh()

id = 0
robotbit_count = 0
koi_count = 0
armourbit_count = 0
msg = 0
robotbit_tags = []
koi_tags = []
armourbit_tags = []
robotbit_tags.append("rfid")
koi_tags.append("rfid")
armourbit_tags.append("rfid")
armourbit_count = 0
koi_count = 0
robotbit_count = 0
robot = robotbit.RobotBit()
screen.sync = 1
wifi.connect(str("name"), "pwd")
mqtt = mqttsimple.MQTTClient("mqtt3.thingspeak.com", "id",user=str("name"), password=str("password"),port=1883)
mqtt.connect()
screen.sync = 0
screen.fill((0, 0, 0))
screen.text(str("Place RFID Tag"),5,10,1,(0, 119, 255))
screen.refresh()
mqtt.publish("channels//publish", str("field1=")+str(robotbit_count))
sleep(1)
mqtt.publish("channels//publish", str("field2=")+str(koi_count))
sleep(1)
mqtt.publish("channels//publish", str("field3=")+str(armourbit_count))
sleep(1)
while True:
  if sensor.btnValue('a'):
    robot.motor(1,170)
  if sensor.btnValue('b'):
    robot.motor(1,0)
  RFID().probe(probeCallback if 'probeCallback' in dir() else None)
  sleep(0.5)
模型玩法
在程式填入Wifi的登入資料和ThingSpeak的主題資料
在程式裡填入與貨品相應的RFID編號
開啟電源後等待未來板連接到ThingSpeak
按A鍵啟動輸送帶,B鍵停止輸送帶
當RFID魔塊感應到貨物的RFID晶片後,未來板會顯示RFID資訊,並且會將貨物資料上傳到ThingSpeak平台
注意:由於ThingSpeak只支援數字,所以ThingSpeak不支援顯示貨品名稱和ID